Showing posts with label Science. Show all posts

Tuesday, April 17, 2012

Cloud Appreciation

If you take the time to really look at them, clouds can be incredibly cool. You might see shapes in the fluffy ones. They can evoke emotion, such as dread in a darkened sky just before a big storm breaks. With experience you can read them to get clues about the coming weather, and scientists create man-made clouds with sounding rockets to study the upper-atmospheric winds.

Here's a website devoted to all the various types of clouds: The Cloud Appreciation Society. Click that link, look at their photo gallery and be prepared to be amazed.

Wednesday, April 4, 2012

Sky Maps

Each month, Skymaps.com publishes a free, printable map of the night sky to help you identify stars, constellations, planets and more. Seriously cool.

Wednesday, March 28, 2012

iNaturalist.org

Mostly, we believe that you should be outside as much as possible, playing and being active. It would be foolish though to act as if the internet didn't exist, especially when you find an interactive website as cool as iNaturalist.org.

Follow that link and you'll discover an ever-expanding library of plant and animal observations from around the world. Suppose you find an interesting fungus while hiking, you can take a picture (or sketch it and make notes like early naturalists did), go online and identify it. If you can't find it there, post it yourself and other folks can help you discover what it is. There are a staggering number of types of living things in our world, and it's a good feeling to be able to identify some of them for yourself.

Friday, March 23, 2012

Building A Model Rocket - part 1

We're going to start a series of posts where I'll build a basic model rocket kit online. The idea is to show the process step by step, including pictures and passing along tips and tricks that I've learned along the way, while you follow along and build your own rocket.

Please feel free to ask questions as we progress, and hopefully we'll see some pictures as folks build and launch their own rockets.

Introduction

The rocket we're going to build is the Estes Fat Boy (see below). You used to be able to get this rocket in the toy section of WalMart, look for model rocket kits near the car model kits. You can also find it in some craft stores and hobby shops, sometimes in other packaging like a bag or box instead of the plastic bubble-package pictured, but it will probably cost a little more. If you'd like to build along and can't find the Fat Boy, you can get something similar because the basic steps will be the same. The Baby Bertha or Alpha would also be good choices, although most any Estes rocket kit will do.


Materials

Now is also the time to gather building materials. If I mention a specific brand, it's because I've used it and know it works. There are all kinds of products out there that'll work just as well.

You're going to need an x-acto knife (or equivalent, you could get by with a single-edge razor blade). You'll also need some yellow or white glue. I recommend Elmer's carpenters glue, if you get the exterior stuff it's gelled and doesn't run and drip nearly as much (it's also brownish). You can also use Eileen's Tacky Glue, TiteBond, white school glue, or anything similar.

The only other must-have will be a pencil.

The following things aren't strictly necessary, but if you use any or all of them you'll have a nicer looking and better flying rocket. They're completely optional, and I'll note when to use them if you want to.

I highly recommend that you get a pack of sewing elastic. You want to get the flat 1/8" wide stuff, and it'll probably be 3 yards long. WalMart sells it for about a dollar, back in the sewing department.

Super-fine sandpaper, at least 220 grit (the higher the number, the finer the grit). You can find this in the hardware department in sheets, or small pads of it in the craft section. WalMart sells an assortment from 3M called 'wet or dry' sanding pack that contains two sheets of 220, two of 320 and a sheet of 400 grit.

Elmer's Fill'n'Finish. Also found in the hardware department, get the smallest tub of this. If they have more than one kind with similar names, hold a tub of each in either hand and pick the lightest weight one. We'll use this to fill the grain in the balsa wood fins and the spirals in the rocket body. You could use a lightweight spackle too.

Fishing swivel. This makes attaching the parachute easier. Don't buy a package of these, but use one if you can borrow it or already have one in your tackle box.

You can wait to get primer and paint, and I'll talk more about it later. Here's a little about it up front though.

Spray primer. I use Rustoleum sandable primer, it comes in white, gray, or even black. Get whatever they have.

Spray paint. Rustoleum or Krylon is what I use. Get whatever colors you want to use. The little cans of Testors paint near the models are cool colors, but very expensive for their size.

Masking tape. You'll need a roll of 1/2" tape if you want to paint your rocket with more than one color.

Next up, we'll take a look at the various parts of the kit and do some pre-assembly work.

Wednesday, March 7, 2012

Climbing the World's Tallest Tree

The tree is named Hyperion, and it's located somewhere in California. They keep the real location of the tallest trees a secret to keep people from damaging them. Ever see where someone carved their name or initials into a tree somewhere? Yeah, those people.

So how tall is Hyperion? It's twice as tall as the Statue of Liberty (minus the base). And scientists know exactly how tall because they measured it the old fashioned way, by climbing to the top and then dropping a tape measure to the ground. Check this out:


More info on Hyperion and other tallest trees can be found here. At the link is a composite photo showing the full height of one of these trees, including someone stationed at various points as they climbed.

Thursday, October 16, 2008

Toy Box Inspiration: Dinosaurs, Part Two

(cross-posted to JH&S)

To recap, I am identifying dinosaurs found in my nephew's toybox. Because I am desperate for material.

Second dino:
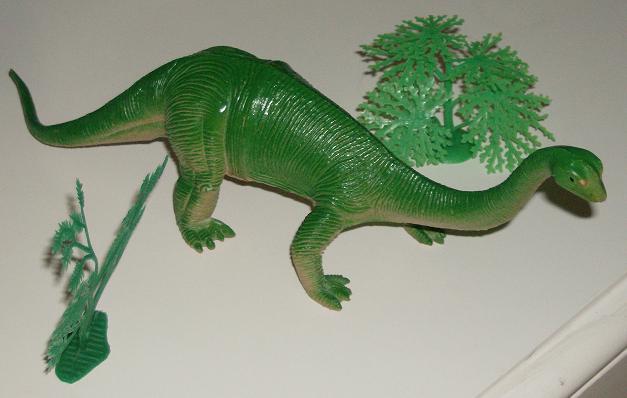
dino2.JPG
(click for dino-size)

What we have here is a mighty herbivore that I grew up thinking was the Brontosaurus, but which is actually a Brachiosaurus. There is no such thing as a Brontosaurus! The guy who found the "Brontosaurus" skull mistakenly identified it as belonging to a new species, but it was really the skull of the already-discovered Apatosaurus, which looks a lot like a Brachiosaurus, but has a much longer tail. Confused yet?

Anywho, the Brachiosaurus was featured as the "veggiesaur" in Jurassic Park that sneezed on Lex. The dino in the movie was more anatomically correct than the dino in the toy box. Brachiosaurus has longer forelimbs than hindlimbs, much like a giraffe. Possibly the toybox version above is some other sauropod, but based on the skull shape and tail length, I'm sticking with Brachiosaurus as my identification here.

Brachiosaurus was one of the biggest dinosaurs and weighed in at around 35 tons. (Completely unrelated link to something else weighing 35 tons.)

Friday, October 3, 2008

Toy Box Inspiration: Dinosaurs, Part One

(cross-posted at JH&S)

So, I needed a little inspiration to post, and I found it in my nephew's box of dinosaurs. He's always liked dinosaurs, and I have encouraged that interest. I try to teach him the names of the different dinosaurs, and what they eat, etc.

Here is the first dinosaur...
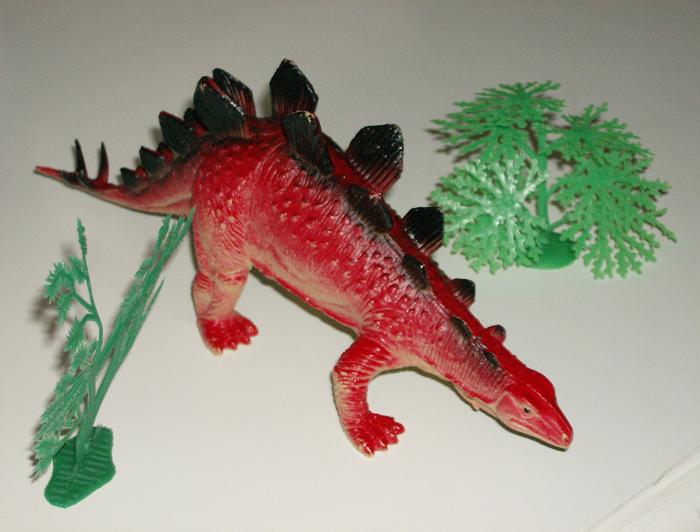
dino1.JPG
(click to enlarge)

Notice the trees I positioned to make it more life-like? Awesome.

Now. What I believe we have here is the mighty stegosaurus. Notice the spikes on the tail, and the alternating armour plates on either side of the spine? Its head seems a little big, but toy dinosaurs aren't always entirely anatomically correct...or maybe they got crazy and made a less-well-known stegosaur. Anywho, this guy was about the size of a bus, and was an herbivore. (Herbivores are plant-eaters.)

See how his front legs bow out like a lizard? That stance, combined with relatively short limbs compared to his bulk, probably mean the stegosaurus was not exactly winning any land races. The tail spikes and possibly the spinal plates were used in defense against predators. Imagine the predator that would look at a spikey, bus-sized stegosaurus and think, "Mmm, tasty."

Saturday, August 25, 2007

Measurement Resources

Some printable paper rulers - Inches and centimeters, of various types, including some without markings to see if you really understand the measurements you're using.

Three printable protractors - Three kinds of markings, for three different types of measurement.

A decimeter box - "The idea: Having a 10 cm cube helps you get to know how big millimeters and centimeters are. Here are pages you can print out, cut out, fold and tape, to make your own 10 centimeter box."

More kinds of graph paper than you can shake a stick at - Wow. Seriously, wow.

Thanks to Friedbeef Tech for these.

Thursday, August 16, 2007

Science at home: Build your own nanotechnology lab

Some of the problems with pursuing modern science at home - or in a school - (particularly electronics or the study of matter at the atomic scale) is that the equipment to be able to see the effects of that scale can cost so much!

Well, here are instructions on making two pieces of equipment used in modern science.
First, the oscilloscope (with a nice history of oscilloscopes to boot):

The oscilloscope is still one of the most important measurement tools of the electronic engineer. With the advent of the often very reasonably priced USB scopes, such an instrument is now within reach of every body.

Second, once you have the oscilloscope, you can build your own scanning tunneling microscope (a key tool in nanotechnology) that is able to resolve atoms:
The goal of this project is to build a simple STM that can resolve atoms, with a cost of materials less than $100.00 excluding oscilloscope. My real goal here is to provide a base of information so experimenters and students could build a simple STM. Typical piezo tubes used in tube scanners of commercial scanning probe microscopes cost in the range of $200 - $800 and operate with several hundred volts applied to the scanner. This design uses a unimorph disk scanner to reduce the cost and avoid using any high voltage. The Piezo element is commonly available and this particular one costs $1.80. The control voltages are so low that two 9-volt batteries can power the control electronics.

Friday, August 10, 2007

The Sky is Falling! The Sky is Falling!

This weekend is a treat for skywatchers and amateur astronomers. The annual Perseid meteor shower should be beautiful because it arrives while a new moon is in the sky. As many as 60 meteors per hour may be visible, with larger ones leaving a streak across the night sky as they burn up in our atmosphere.

As a bonus, the planet Mars will be visible as a bright red dot in the sky to the northeast.

Unlike most astronomical events, meteor watching is done best without telescope or binoculars. Get comfortable, pick out a patch of black sky away from light pollution, and watch patiently. The closer towards dawn, the more meteors you might see. The peak number should be Sunday night into Monday morning, but they'll be visible for several nights afterwards too.

Every August at this time the Perseid shower occurs. Named for the constellation Perseus - because that's where the meteors appear to come from - their real origin is the comet Swift-Tuttle. When Earth crosses the path of the comet, debris from the comet's passing enters our atmosphere and gives us a light show.

Thursday, August 9, 2007

A Planetarium on your Desktop

Have you ever stood outside on a cold, clear night, looking at the stars?

If you can get out into the country, away from city lights, you can see thousands of stars...and once in a while, the quick streak of a meteor.

There's no denying the beauty of the night skies. When you look at the stars, you are looking at the last, greatest unexplored frontier, a frontier into which Mankind has taken its most halting baby steps. Moon landings and probes sent skittering through the solar system, out into the Oort Cloud...and in a few hundred years, who knows where we will have traveled to?

Men and women have been gazing at the stars since time began. There are those who misguidedly believe that the stars influence our lives: these are the kind of people who take horoscopes seriously and who really care whether you're a Libra or a Sagittarius. Where I come from, we call them "nuts." But anyone with a speck of imagination will look at the skies and see the ghostly patterns formed by the stars.

These patterns - constellations - all have names, names that are unique to each human culture. And now you can look at the skies and see all of those constellations and planets without leaving your house.

Check out Stellarium, a wonderful open-source computer program that turns your computer into a planetarium! You can download it at no charge: just click on the link. Once you've downloaded and installed the program (ask your parents for permission first, before installing any software), it will show the skies in real time. All you have to do is tell it where you are, and it will display the a picture of the sky, day or night. Just drag with your mouse to look in any direction...and you can zoom in to look at planets and nebulae more closely. Click on any star, planet, or galaxy, and detailed information will appear at the top left corner of your screen.

Stellarium
[Click on image to expand.]

Thanks to Joan of Argghh! for the link!

Tuesday, August 7, 2007

Pinhole Cameras

Modern digital photography has made taking pictures a simple affair. Press a button, and BINGO! You can look on the display screen and see exactly what your picture looks like.

In the Olden Days of film cameras, you had to wait three days to get your pictures back from the drugstore, only to find that you left your lenscap on for half of 'em, two of them have your Aunt Betty's head chopped in half, and your pinkie finger covered half the lens when you took that shot of Rover on the skateboard in the supermarket parking lot. Now, with a digital camera, you can see all those lousy pictures right away. Joy!

But there were advantages to using those old-school film cameras. One of them was that you could develop your own pictures. Not all that hard if you took black-and-white pictures...definitely a challenge if you took color pictures. And there was nothing quite as exciting as watching your pictures appear as if by magic as you put the paper in the developing tray.

You can do all this today - and you don't even need to buy a camera. Because all you really need is a few simple, easily available supplies (like an empty oatmeal canister, a used aluminum soda can, and some flat black spray paint) and you can take and develop your own pictures using a pinhole camera that you build yourself!

It might seem surprising, but if light passes through a small enough hole, it gets refracted (bent) just as though it had gone through a lens! In fact, the very first cameras - long before photography was invented - were darkened rooms with a small opening. Light would come in through this tiny hole, and an upside-down image would be projected on the opposite wall of the room. The room was called a camera obscura, which simply means "dark room" in Latin - and that's where our modern word "camera" came from.

It was easy enough for people to figure out that a camera obscura didn't have to be as big as a whole room. You could build one in a box, and if you put a sheet of frosted glass on the side opposite the little hole, you could see the image on the glass. Finally, in 1826, the French inventor Nicéphore Niépce figured out how to capture the image permanently, using chemicals. It wasn't easy, though - the first permanent photograph took eight hours to shoot!

Modern cameras use film - or an electronic sensor in the case of digital cameras - to capture images. And they use lenses instead of pinholes...mainly because lenses let a lot more light through, so exposures can be tiny fractions of a second instead of many minutes. But pinhole cameras can still be used to capture beautiful images, and you don't need any fancy equipment to build one.

Rather than "reinvent the wheel," I've found an excellent Web resource that gives complete, step-by-step instructions for building your own pinhole camera, taking pictures, and developing them yourself. You can find it here at Stew Woodruff's Oatmeal Box Pinhole Photography website.

Whether you take your own pinhole photographs, or whether you just browse the gallery at the Oatmeal Box Pinhole Photography site, you'll notice that the photographs are all exceptionally sharp, and many of them have a "wide-angle" appearance. It's one of the things that make pinhole photos so unusual-looking. Try it!

Thursday, August 2, 2007

How High Is That?

If you want to figure out how tall something is (like a house or tree), or how high it goes (like a rocket or balloon), there’s a simple and inexpensive way to get a fair estimate.

You’ll need a couple things for this, but they’re easy to find and you probably already have them around the house. Find a protractor and a rectangular piece of cardboard bigger than the protractor. You’ll also need a push pin, some string and a weight of some kind (I used a fishing sinker).


First, let’s make a simple theodolite, which is a tool used to measure vertical angles. Take the cardboard and using the push pin, fasten the protractor to it so that the flat edge of the protractor runs along the top of the cardboard. Tie the weight to one end of the string and the other end to the pin. This way, when you tilt the cardboard you can read the angle by seeing where the string hangs past the protractor.


The other thing you’ll need is a tangent table, which can be found in any trigonometry textbook. That’s right, you’re using trigonometry for this! Use the one below, or find one to your liking, they're all the same (click it and it gets bigger).


Still with me? Good! Believe me, this is simple. In fact, this explanation takes longer than the process. The figure below shows the basic concept of determining height or altitude:


Take the theodolite and stand a known distance from what you’re trying to measure. In the diagram, it's where the black and blue lines meet. This distance is the baseline, and the farther the better (as long as you can see the top of the thing you’re measuring). For instance, say you’re going to measure the altitude of a model rocket, and you’re launching from a football field. The tracker is on one goal line, 300 feet (100 yards) away from the launch pad on the other goal line. When the rocket launches, the tracker follows the rocket with the theodolite until the rocket reaches apogee (it's highest point). The angle is read (where the string marks it on the protractor), and this angle is written down.

Time for some simple math. The formula is on the diagram. Look up the tangent for the angle on the table, multiply that number by the baseline, and that is the altitude in feet. Simple!!!
An example: baseline is 300 feet and your measured angle is 40 degrees. The tangent for 40 degrees is .839, so 300 * .839 = 251.7 feet.

This technique works great for things that stand still or go straight up, but the measurement will be off if there’s any horizontal movement. Using our model rocket example again, if the rocket curves towards you on the way up, then your measured angle will increase and the calculated altitude will be too high. One way to compensate for this is to have two people with theodolites standing at 90 degrees from each other (imagine a rocket launching from home plate on a baseball diamond and trackers standing on first and third bases). You can average their measurements and get a pretty good estimate of the correct height.

You can also make a sturdier theodolite by replacing the cardboard with a length of wood or broomstick. Screw the protractor into the side of the wood, hold the theodolite like a rifle and sight along the length of it to get your measurement. You can drive a couple of finishing nails into the top of the wood to help with your sighting if you want, but it's not strictly necessary.

So, how high is the tallest tree in your neighborhood?

Friday, July 27, 2007

Moon Trees

During the Apollo missions that landed on the moon, one member of each crew stayed in orbit while the other two descended to the surface. One of these Command Module Pilots was Stu Roosa, who was a smoke jumper before he became an astronaut. Besides photographing the moon from orbit and performing other scientific experiments, Roosa carried with him 500 tree seeds. The idea was to plant them when he returned to Earth and to watch over time to see what effect the trip into space might have on them.

Over 400 seedlings were grown from the seeds, and they were planted in various places around the US and the world. If you follow this link to the Moon Trees page, you'll find a list at the bottom showing where many of them are planted.

Maybe one is close enough to you to visit. After all, not every tree went around the moon and back!